When you grow up without a handy parent—or any parent who can show you the difference between a drill bit and a drywall screw—homeownership can feel like a treasure hunt where all the clues are written in a language you’ve never seen before.
That’s exactly where I found myself: a fatherless daughter, raised by a single mom who did her best but wasn’t exactly out here rebuilding decks or hanging doors. So when I recently moved into an older home, I was determined not to let my lack of a “house-skills childhood” stop me. I was going to change the back-door deadbolt. How hard could it be?
Turns out: harder than YouTube makes it look.
The Mystery of the Door With Two Eras
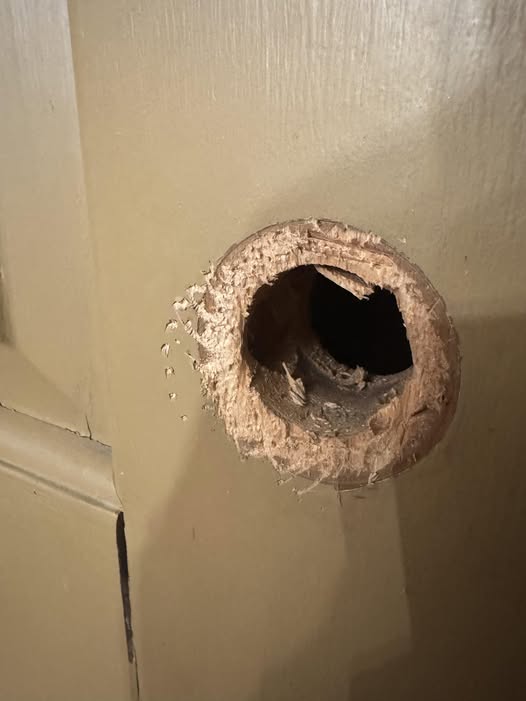
The new lock required a 2⅛-inch hole. The door did once have that size, but at some point someone decided to reduce it to 1½ inches by gluing in a plug of wood. Why? No idea. Probably the same person who painted over the hinges.
Armed with optimism and a brand-new hole saw attachment, I lined everything up, braced myself, applied pressure, squeezed the trigger…
…and the hole saw skated sideways like it was late for the Olympics.
Not only did it not cut where I needed it to, it chewed a lovely arc into the paint, proving only that I was, in fact, holding a power tool.
So What Was I Doing Wrong?
Here’s the thing nobody tells beginners: Hole saws are terrible at starting on flat, hard, already-finished surfaces—especially if you’re trying to widen an existing hole. They need grip. They need stability. And they definitely need a pilot bit that can actually bite into something.
If you’re trying to cut into a patched hole, that surface is often uneven, slippery, or too hard for the pilot bit to center itself. So instead of drilling downward, the hole saw just rides around on top like a frisbee.
How to Fix It (Without Needing a Handy Dad, Uncle, Neighbor, or Ghost)
You’re not doing anything “wrong”—you’re just missing a stabilizer. Here are the methods pros use:
1. Use a Hole Saw Guide Plate
This is a simple plastic or metal jig that clamps to the door and gives your hole saw walls to follow. No skidding, no wandering.
2. Make a Temporary Guide Out of Scrap Wood
If you’re handy-ish and have scrap lumber:
- Drill a clean 2⅛-inch hole through the scrap wood using your hole saw (where it can bite).
- Clamp that piece of wood tightly over your door.
- The scrap wood hole becomes the perfect guide for the real cut.
3. Use a Spade Bit First (Just to Start a Center)
If the wood plug is too smooth or too hard for the pilot bit:
- Drill a small pilot divot using a spade bit or a small twisting bit.
- Once the pilot bit has a “home,” the hole saw has no reason to skate.
4. Go Slower Than You Think
Hole saws want controlled, even pressure, not full trigger speed. Slow RPM gives the teeth a chance to dig in.
5. Tape the Area
Painter’s tape adds grip and reduces surface skating. It’s not enough on its own for enlarging a hole, but it helps.
You’re Not Failing. You’re Learning.
Anyone who didn’t grow up around tools ends up learning moments like this the hard way. You didn’t do anything wrong—you’re just gaining the skills set by set, mistake by mistake, hole by hole.
And honestly? That’s something to be proud of.
You’re not just changing a deadbolt.
You’re rewriting a story you were never given the chance to learn growing up.
One wobbly hole saw at a time.
