In today’s busy world, finding time to make something sweet and comforting can often feel like a luxury. Between work schedules, family responsibilities, and everyday chaos, the idea of baking a dessert from scratch might seem impossible. But what if you could create something rich, smooth, and irresistible in just a few minutes—with no oven, no whisking, and almost no mess?
Welcome to the world of blender desserts—a simple, time-saving, and utterly satisfying solution for anyone who loves indulgence without the effort. This creamy creation isn’t just easy; it’s elegant enough for a dinner party and comforting enough for a midnight treat. With just a handful of common ingredients, a blender, and a little imagination, you can transform your kitchen into a dessert haven.
A Dessert Revolution: Why the Blender is Your Best Friend
The blender has long been a hero in kitchens—making smoothies, sauces, soups, and even batters. But its potential for dessert-making often goes unnoticed. Unlike traditional methods that require folding, whipping, or baking, blending allows you to mix and aerate ingredients simultaneously. The result? A luscious texture that feels gourmet but takes minimal effort.
This dessert celebrates that very magic. Everything—cream, milk, flavoring, and sweetness—comes together effortlessly in your blender, resulting in a mousse-like treat that feels silky, light, and refreshing. You don’t need advanced skills or expensive tools; you just need to press a button.
Gathering the Essentials: What You’ll Need
You don’t have to go on a shopping spree to create this dessert. The ingredients are simple, affordable, and likely already waiting in your pantry or refrigerator.
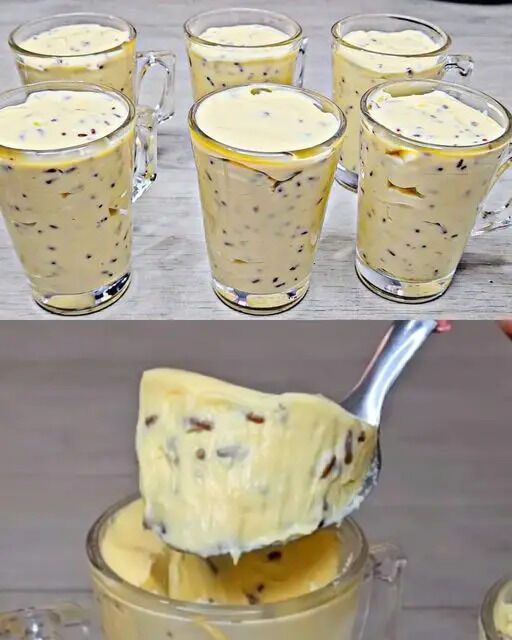
- Heavy Cream (or Whipping Cream): This provides the dessert’s rich foundation. Its fat content gives structure and body, helping it set beautifully after chilling.
- Sweetened Condensed Milk: The heart of the sweetness. It ensures a smooth, luxurious finish without any grittiness from sugar crystals.
- Whipped Cream: The secret to lightness. It creates that airy, mousse-like texture, balancing the richness of the cream.
- Powdered Drink Mix or Cocoa Powder: This is where creativity enters. You can choose any flavor—chocolate for decadence, strawberry for freshness, coffee for sophistication, or even tropical fruits for something bright and sunny.
- Optional Garnishes: Chocolate shavings, cookie crumbs, toasted nuts, or a few slices of fruit can elevate the look and flavor.
Each ingredient serves a purpose. When combined, they create a balance of sweetness, creaminess, and aroma that’s hard to resist.
Step-by-Step: How to Make the Perfect Blender Dessert
Step 1: Prepare Your Ingredients
Start with chilled cream—this ensures better aeration and faster blending. If your whipped cream isn’t pre-made, whip it separately until soft peaks form. Gather your condensed milk and flavor mix nearby to keep the process seamless.
Step 2: Blend the Base
Add heavy cream, sweetened condensed milk, and your powdered flavor mix into the blender. Blend at medium speed for about 45–60 seconds. The goal is to combine everything smoothly while incorporating just enough air to make it light.
Step 3: Add Whipped Cream
Once the base looks uniform, gently add whipped cream. Pulse two or three times to fold it in without deflating its fluffiness. The texture should now look silky, thick, and slightly glossy—similar to a milkshake that’s halfway to becoming mousse.
Step 4: Taste and Adjust
Before chilling, taste the mixture. If it’s too sweet, add a small splash of milk or unsweetened cream. If you want a bolder flavor, add more of your drink mix or a teaspoon of cocoa or coffee powder.
Step 5: Chill to Set
Pour the mixture into individual cups, bowls, or a large serving dish. Smooth the top and cover with plastic wrap. Chill for at least two to three hours, or overnight for a firmer texture.
When it’s ready, the dessert should be thick yet soft, creamy yet spoonable—a texture that melts beautifully in your mouth.
The Science Behind the Creaminess
What makes this recipe stand out is how the blender introduces air into the mixture. As the blades spin, they trap tiny air bubbles, which lighten the texture without needing whipped egg whites or gelatin. The fat content in the cream stabilizes these bubbles, creating that velvety consistency.
Meanwhile, condensed milk acts as both a sweetener and a binder. Its sugar content draws in moisture, while its milk solids add density, preventing the dessert from separating or becoming watery.
This perfect balance of fat, air, and sugar means that every spoonful feels smooth, stable, and delicious—even after a few days in the fridge.
Creative Flavor Variations
The base recipe is a blank canvas. Once you master it, you can reinvent it countless ways. Here are a few irresistible ideas:
1. Classic Chocolate Indulgence
Use cocoa powder or chocolate drink mix, and blend in a few tablespoons of melted dark chocolate. Top with chocolate curls or a drizzle of ganache for a luxurious finish.
2. Coffeehouse Cream Dream
Add a spoonful of instant espresso powder to the mix and finish with a swirl of caramel. It’s like a dessert version of your favorite latte.
3. Strawberry Delight
Use a strawberry-flavored drink mix or fresh puréed berries. Add crushed cookies or biscuit crumbs for a layered effect that looks stunning in glass cups.
4. Tropical Bliss
Go for coconut or pineapple flavors, and top with toasted coconut flakes. You can even mix in small bits of mango for a sunny twist.
5. Cookies & Cream Fantasy
Crush chocolate sandwich cookies into the blender. The cookie crumbs add crunch and depth while keeping that nostalgic childhood charm.
6. Pistachio Paradise
Blend in a bit of pistachio paste or mix, then sprinkle chopped nuts on top. It’s nutty, aromatic, and perfect for elegant gatherings.
7. Caramel Crunch
Swirl in a few spoons of caramel sauce before chilling. Once set, sprinkle sea salt or crushed toffee on top for a sweet-salty masterpiece.
Each variation takes less than a few minutes to customize, yet completely transforms the dessert’s personality—from cozy and homely to refined and restaurant-worthy.
Serving and Presentation Tips
A dessert’s visual appeal matters as much as its flavor. With just a few finishing touches, you can make this simple treat look like it came from a professional pastry chef’s kitchen.
- Individual Glasses: Use wine glasses, jars, or ramekins. They make serving easier and look elegant on the table.
- Trifle Dish: For parties, layer the dessert with crushed cookies, nuts, or fruit in a transparent bowl to create a show-stopping centerpiece.
- Toppings: Garnish right before serving. Think chocolate shavings, caramel drizzle, mint leaves, or even edible flowers.
- Temperature: Always serve chilled. The cold enhances the flavor and texture, making each bite more refreshing.
Tips for Perfect Results Every Time
- Keep Ingredients Cold – The colder the cream, the better it whips and thickens.
- Don’t Overblend – Too much blending can break down the cream and make it grainy. Stop as soon as the texture looks smooth and thick.
- Adjust Sweetness – Taste before chilling. Condensed milk can vary in sweetness depending on the brand.
- Add a Pinch of Salt – A small pinch enhances the flavor balance and reduces the perception of excessive sweetness.
- Use High-Quality Flavorings – Whether cocoa, coffee, or fruit puree, better quality ingredients always lead to richer flavor.
Storing and Shelf Life
This dessert can easily be made ahead of time, making it ideal for meal prep or hosting events. Store it in airtight containers or covered bowls in the refrigerator for up to four days. If it starts to loosen slightly, give it a gentle stir before serving.
Freezing is possible too. When frozen, it transforms into a semi-freddo-style treat—creamy like ice cream but with a lighter texture. Simply let it soften for ten minutes before eating.
Pairing Ideas
To create a complete dessert experience, pair this creamy treat with other complementary items:
- Hot Beverages: Serve with espresso, hot chocolate, or tea for contrast.
- Crispy Sides: A small cookie, biscuit stick, or wafer pairs beautifully with the soft creaminess.
- Fresh Fruit: Berries, banana slices, or mango chunks add natural sweetness and freshness.
- Nutty Toppings: Almonds, hazelnuts, or pistachios add crunch and aroma.
